6-Axis
下载驱动库
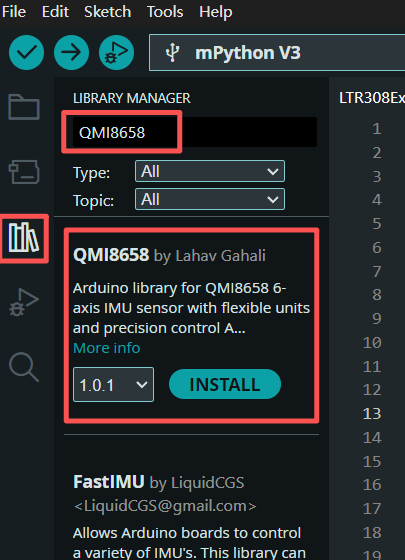
搜索QMI8658库并安装。
示例代码
在arduino IDE中,点击「File」→「Examples」→「QIM8658」→「QMI8658_Basic」打开示例。
注意
掌控板QMI8658 6轴连接到IIC接口,SDA接P20(GPIO44),SCL接P19(GPIO43).找到并修改以下代码行:
bool success = imu.begin(44, 43);
示例-QMI8658.ino
  1/*
  2  QMI8658 Basic Example - Enhanced with Flexible Units & Precision
  3
  4  This example demonstrates the enhanced QMI8658 library with flexible
  5  unit selection and precision control.
  6
  7  New Features:
  8  - Choose between mg or m/s² for accelerometer
  9  - Choose between dps or rad/s for gyroscope
 10  - Set decimal precision (2, 4, 6 digits)
 11  - Alternative reading functions for specific units
 12
 13  Connections for RP2040:
 14  - VCC to 3.3V
 15  - GND to GND
 16  - SDA to pin 44
 17  - SCL to pin 43
 18
 19  Author: [Your Name]
 20  Date: [Date]
 21*/
 22
 23#include <QMI8658.h>
 24
 25// Create QMI8658 instance
 26QMI8658 imu;
 27
 28void setup() {
 29    Serial.begin(115200);
 30    delay(1000); // Wait for serial to stabilize
 31
 32    Serial.println("🚀 QMI8658 Enhanced Library - Flexible Units & Precision");
 33    Serial.println("========================================================");
 34
 35    // Initialize the sensor with pins 6,7 (uses Wire1 automatically on RP2040)
 36    Serial.println("📍 Initializing sensor...");
 37    bool success = imu.begin(44, 43);
 38
 39    if (!success) {
 40        Serial.println("❌ Failed to initialize QMI8658!");
 41        Serial.println("Please check:");
 42        Serial.println("- Wiring connections (SDA=6, SCL=7)");
 43        Serial.println("- Power supply (3.3V)");
 44        Serial.println("- I2C address");
 45        while (1) {
 46            Serial.println("⏳ Retrying in 5 seconds...");
 47            delay(5000);
 48        }
 49    }
 50
 51    Serial.println("✅ QMI8658 initialized successfully!");
 52    Serial.print("WHO_AM_I: 0x");
 53    Serial.println(imu.getWhoAmI(), HEX);
 54
 55    // Configure sensor settings
 56    Serial.println("\n⚙️ Configuring sensor...");
 57
 58    // Set accelerometer range (±8g)
 59    imu.setAccelRange(QMI8658_ACCEL_RANGE_8G);
 60
 61    // Set accelerometer output data rate (1000Hz)
 62    imu.setAccelODR(QMI8658_ACCEL_ODR_1000HZ);
 63
 64    // Set gyroscope range (±512dps)
 65    imu.setGyroRange(QMI8658_GYRO_RANGE_512DPS);
 66
 67    // Set gyroscope output data rate (1000Hz)
 68    imu.setGyroODR(QMI8658_GYRO_ODR_1000HZ);
 69
 70    // ⭐ NEW: Configure units and precision
 71    Serial.println("\n🎯 Setting units and precision...");
 72
 73    // Set units (DEFAULT: mg for accel, dps for gyro - matches most IMU displays)
 74    imu.setAccelUnit_mg(true);      // Use mg (like your screen: ACC_X = -965.82)
 75    imu.setGyroUnit_dps(true);      // Use dps (degrees per second)
 76    imu.setDisplayPrecision(6);     // 6 decimal places (like your screen)
 77
 78    // Alternative ways to set units:
 79    // imu.setAccelUnit_mps2(true);  // Would use m/s² instead of mg
 80    // imu.setGyroUnit_rads(true);   // Would use rad/s instead of dps
 81    // imu.setDisplayPrecision(QMI8658_PRECISION_4); // 4 decimal places
 82
 83    // Enable sensors
 84    imu.enableSensors(QMI8658_ENABLE_ACCEL | QMI8658_ENABLE_GYRO);
 85
 86    Serial.println("✅ Configuration complete!");
 87
 88    // Show current settings
 89    Serial.println("\n📋 Current Settings:");
 90    Serial.print("   Accelerometer unit: ");
 91    Serial.println(imu.isAccelUnit_mg() ? "mg" : "m/s²");
 92    Serial.print("   Gyroscope unit: ");
 93    Serial.println(imu.isGyroUnit_dps() ? "dps" : "rad/s");
 94    Serial.print("   Display precision: ");
 95    Serial.print(imu.getDisplayPrecision());
 96    Serial.println(" decimal places");
 97
 98    Serial.println("\n📊 Starting sensor readings...");
 99    Serial.println("Time(ms)\tAcc_X(mg)\tAcc_Y(mg)\tAcc_Z(mg)\tGyro_X(dps)\tGyro_Y(dps)\tGyro_Z(dps)\tTemp(°C)");
100    Serial.println("-----------------------------------------------------------------------------------------");
101
102    delay(100); // Allow sensor to stabilize
103}
104
105void loop() {
106    // Method 1: Read all sensor data at once (recommended)
107    QMI8658_Data sensorData;
108
109    if (imu.readSensorData(sensorData)) {
110        Serial.print(millis());
111        Serial.print("\t");
112        Serial.print(sensorData.accelX, 6);
113        Serial.print("\t");
114        Serial.print(sensorData.accelY, 6);
115        Serial.print("\t");
116        Serial.print(sensorData.accelZ, 6);
117        Serial.print("\t");
118        Serial.print(sensorData.gyroX, 6);
119        Serial.print("\t");
120        Serial.print(sensorData.gyroY, 6);
121        Serial.print("\t");
122        Serial.print(sensorData.gyroZ, 6);
123        Serial.print("\t");
124        Serial.println(sensorData.temperature, 1);
125    } else {
126        Serial.println("❌ Failed to read sensor data!");
127    }
128
129    /*
130    // Method 2: Read sensors individually with specific units
131    float ax, ay, az;
132    float gx, gy, gz;
133    float temp;
134
135    // Read with default configured units
136    if (imu.readAccel(ax, ay, az) && imu.readGyro(gx, gy, gz) && imu.readTemp(temp)) {
137        Serial.print("📈 Accel (mg): ");
138        Serial.print(ax, 6); Serial.print(", ");
139        Serial.print(ay, 6); Serial.print(", ");
140        Serial.print(az, 6);
141
142        Serial.print(" | Gyro (dps): ");
143        Serial.print(gx, 6); Serial.print(", ");
144        Serial.print(gy, 6); Serial.print(", ");
145        Serial.print(gz, 6);
146
147        Serial.print(" | 🌡️ Temp: ");
148        Serial.print(temp, 1);
149        Serial.println("°C");
150    }
151
152    // Method 3: Read with specific units (if supported by your library)
153    // Example: Force read in m/s² even if default is mg
154    // if (imu.readAccel_mps2(ax, ay, az)) {
155    //     Serial.print("Accel in m/s²: ");
156    //     Serial.print(ax, 6); Serial.print(", ");
157    //     Serial.print(ay, 6); Serial.print(", ");
158    //     Serial.println(az, 6);
159    // }
160    */
161
162    delay(100); // Read at 10Hz
163}
运行效果
串口打印6轴数据。